The team at Rite-Way Custom Homes brings decades of combined experience in custom home building, luxury renovations, and thoughtful design to every project. From concept design and custom home construction to kitchen and bathroom remodeling, home additions, and basement finishing, our team is dedicated to helping homeowners create spaces that are both beautiful and built to last. We share practical insights, design trends, and expert advice to help you make informed decisions about your next home project.
Walking through a model home is designed to close deals: the quartz catches the light, the paint smells fresh, and the staging makes every room feel expansive. A smart new construction townhome checklist shifts your attention to what a model cannot show you, such as whether the ductwork runs through unconditioned attic space, whether the shared firewall offers real acoustic resistance, and whether the builder’s warranty protects your investment or their bottom line.
A townhome puts you in the position of a single-family owner who shares walls, roofs, and sometimes mechanical infrastructure with neighbors. That makes structure, systems, and community rules all matter at once. The sections below organize what to verify by phase, so you know what to look for at contract, during construction, and at your final walkthrough.
A New Construction Townhome Checklist for Every Phase of the Purchase
How to Use a New Construction Townhome Checklist
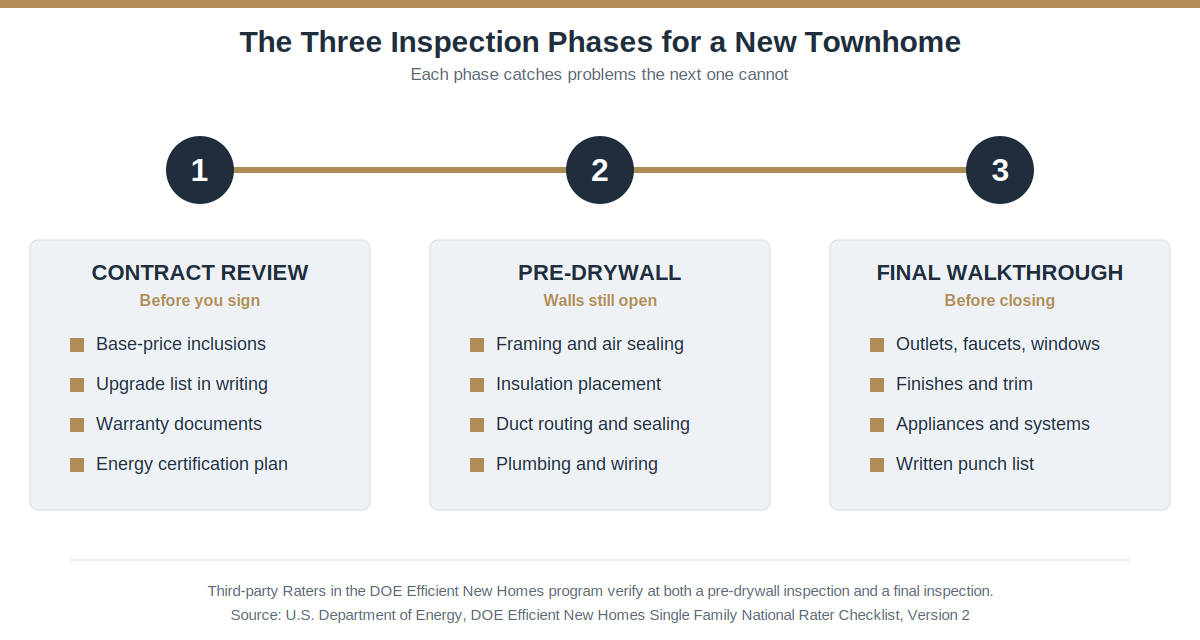
Most buyers treat a checklist as a final walkthrough tool, something to pull out the day before closing to confirm the faucets run and the paint is not scuffed. That undersells it. A well-built checklist works across three phases: contract review, where you compare base-price inclusions against the upgraded model; the pre-drywall inspection, where mechanical systems, insulation, and framing are still visible; and the final walkthrough, where you document deficiencies while you still hold leverage over corrections.
At the contract stage, get every inclusion and upgrade in writing. Finish selections, appliance packages, and layout choices are far easier to settle when they are tied to a detailed concept design process than when they are left to a sales conversation in front of a staged model.
Why an Independent Inspector Matters
Hiring an independent inspector for both the pre-drywall and final phases is a prudent way to protect your investment. Municipal inspectors verify minimum code compliance. They are not evaluating whether your ductwork is routed well or whether your insulation performs at the level that actually affects your utility bills. An inspector with new construction experience will catch items that pass code but fall short of the standard you expect.
Work from the outside in: exterior envelope first, then mechanical systems, then interior finishes. That order prevents the common mistake of fixating on cosmetic details while missing structural or performance problems. The countertop is easy to judge. The air sealing at the rim joist is not visible after drywall goes up, which is exactly why you need eyes on it before it disappears.
Construction Quality and Finish Details to Inspect
The gap between a standard production townhome and one built to a measurably higher standard is wider than most buyers expect. Superior soundproofing between shared walls, careful moisture management at the building envelope, and framing that exceeds minimum code are the details that decide whether a home holds its value or becomes a maintenance burden. Premium builders treat the envelope as a system. Production builders often treat it as the minimum required to pass inspection.
Mechanical Systems, Insulation, and Energy Performance
The heating and cooling system drives comfort, indoor air quality, and a meaningful share of your monthly operating costs. Sizing matters as much as the efficiency rating, because an oversized system short-cycles, leaves humidity uncontrolled, and wears out components early. Ask the builder for the Manual J load calculation used to size the equipment, and confirm it was done for your actual unit rather than approximated from a similar floor plan.
Insulation is measured by R-value, which describes a material’s resistance to heat flow. Think of it like a thermos: you want it to hold the heat in during winter and the cool air in during summer. Ask what R-values are specified for the attic, walls, and foundation, which climate zone requirements the design follows, and whether a third party verified the installation.
Duct location is one of the most consequential and least discussed decisions in a new townhome. Ductwork routed through an unconditioned attic or exterior wall cavity loses conditioned air before it reaches the living space, no matter how efficient the furnace is. High-performance programs such as DOE Efficient New Homes expect ducts to sit inside the home’s thermal and air barrier boundary, so ask exactly where they run and whether the system was tested for leakage.
For heating efficiency, the benchmark is Annual Fuel Utilization Efficiency, or AFUE. A condensing gas furnace rated at 95% AFUE converts roughly 95 cents of every fuel dollar into usable heat, a substantial improvement over mid-efficiency equipment, and the gap compounds over the life of the home in a cold climate.
System
What to Ask the Builder For
Why It Matters
Heating and cooling
Manual J load calculation for your unit
Prevents short-cycling, humidity problems, and early wear
Insulation
Specified R-values and third-party verification
Drives comfort and long-term utility costs
Ductwork
Duct location and leakage test results
Ducts inside conditioned space lose far less air
Furnace
AFUE rating of the installed equipment
Determines how much fuel becomes usable heat
Windows
U-factor and Solar Heat Gain Coefficient labels
Controls heat gain and loss through glass
Air sealing
Blower door test results
Measures how tight the envelope really is
Window Specifications
Low U-factors and climate-appropriate Solar Heat Gain Coefficients (SHGC) determine how much heat your windows admit and retain. Verify that the windows in your contract match the performance values recommended for your climate zone, not a warmer-climate default.
Water Efficiency
WaterSense labeled showerheads, faucets, and toilets reduce consumption without sacrificing performance. Ask how hot water is delivered, since a long run between the water heater and the fixtures wastes both water and the energy used to heat it.
Solar and EV Readiness
A solar-ready designation means the builder has reserved roof area, run conduit, and set aside breaker space for a future array, a low-cost step during construction that is expensive to retrofit later. For electric vehicles, look for a dedicated 240-volt circuit in the garage or near the private driveway. Both provisions cost little now and add real resale value as electric vehicles become standard.
Evaluating Third-Party Energy Certifications
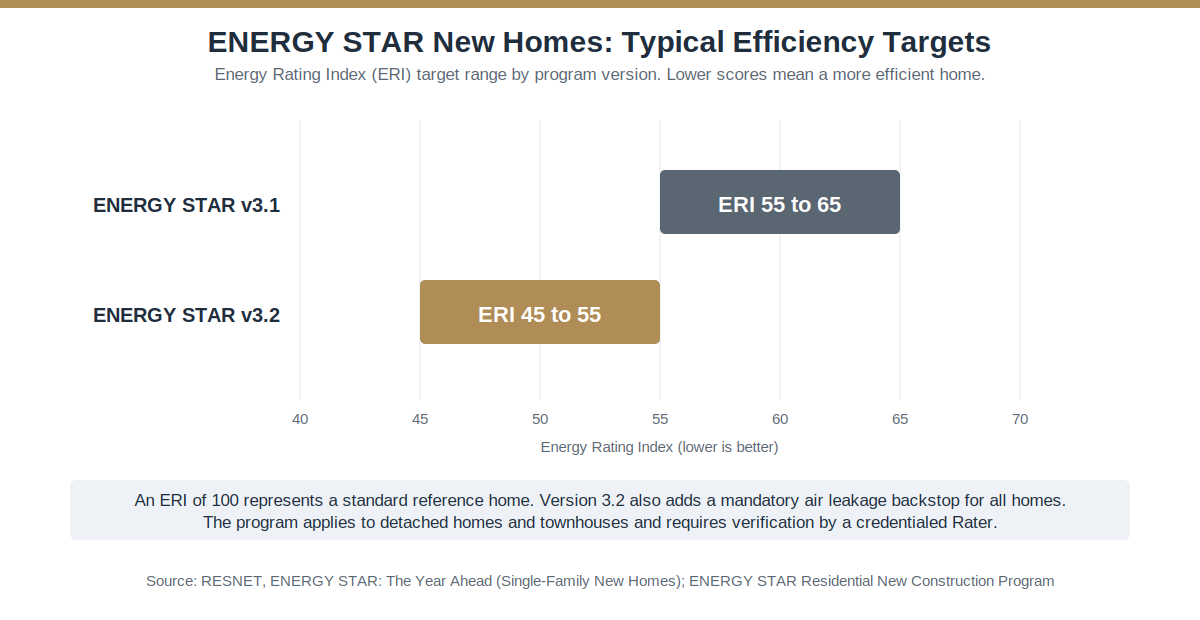
Voluntary federal programs give buyers something builder marketing cannot: an independent, verified performance record. A credentialed third-party Rater physically measures air leakage, duct performance, and mechanical output instead of simply looking at the work. The ENERGY STAR Single-Family New Homes program applies to townhouses as well as detached homes, so it is a useful benchmark when you compare builders.
Program versions keep tightening. Version 3.2 targets a lower Energy Rating Index than Version 3.1 and adds a mandatory air leakage limit for every home, and it is now required in a growing number of states for newly permitted homes. Ask which version applies to your townhome and when the Rater will verify it. DOE high-performance benchmarks go further, pairing a tight envelope with efficient equipment and renewable-ready infrastructure to approach net-zero energy use.
A home certified to these standards costs less to operate and has a more defensible resale story than one that only meets the local code minimum. To see how rigorous quality control and verification can be managed from the first drawing to the final inspection, explore the custom home building process and compare it with what your townhome builder offers.
Shared Walls, Parking, and Community Questions to Ask
Three ownership questions are consistently underestimated by buyers. Each one affects daily life or long-term cost far more than the finishes in the model.
Shared Wall Soundproofing
Ask the developer exactly how the shared firewall is built: double-stud framing, resilient channel mounting, or sound-dampening drywall. A single-stud wall with fiberglass batts can pass fire code and still provide limited acoustic separation. The difference between that and a properly isolated double-stud assembly is something you will hear, or not hear, every day.
Parking and Deed Allocations
Confirm whether your parking space, driveway, or garage is deeded to your unit or classified as a common element managed by the association. That distinction determines whether you can sell, rent, or modify the space independently.
Community Build-Out and Association Control
Get the projected timeline for amenities, landscaping, and road paving in writing, along with the plan for transferring association control from the developer to residents. Ask who maintains and funds shared roofs, siding, and common areas. These questions feel administrative, but the answers determine your financial exposure for years after closing.
What to Review Before the Final Walkthrough
The final walkthrough is the last moment before closing when you hold real leverage. Treat it like a detective scene, where every corner has a story to tell. Deficiencies documented before closing become the builder’s obligation to fix, while those found afterward become warranty claims, which can be slower and less certain.
Walk every room with your phone camera running and photograph anything that does not match the contract.
Test every outlet with a phone charger and confirm every light fixture works.
Run every faucet, flush every toilet, and check under sinks for slow drainage or leaks.
Open, close, and lock every window and exterior door.
Operate the furnace, air conditioner, water heater, and every included appliance.
Record each deficiency in a written punch list and have the builder sign it.
Understanding Your New Construction Warranty
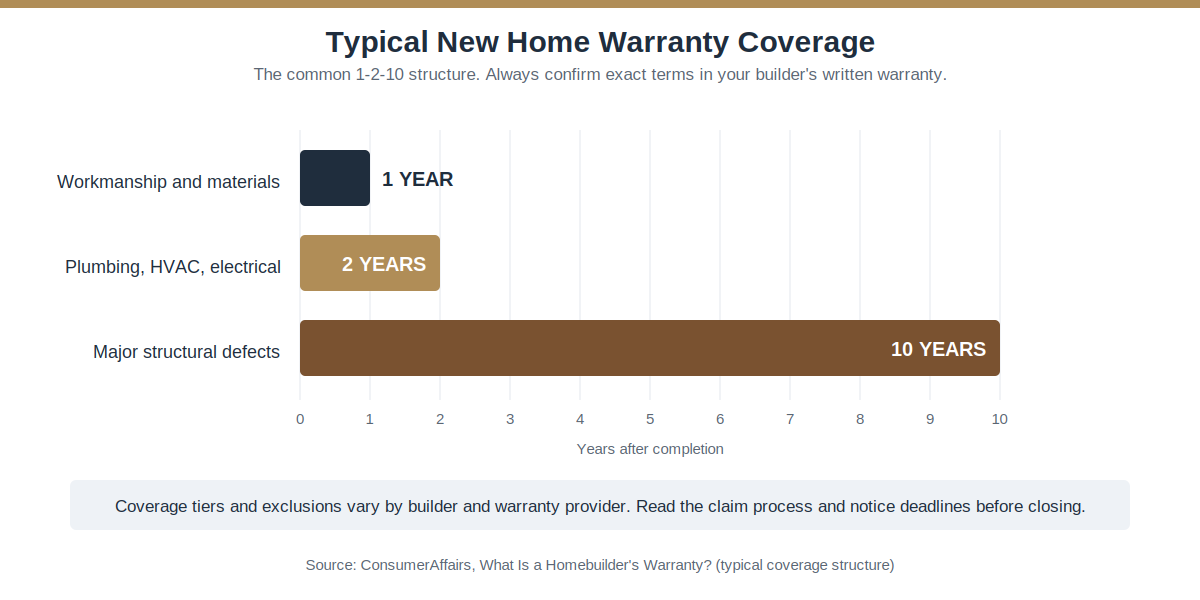
Most builder warranties follow a tiered schedule: one year for workmanship and materials, two years for major systems such as plumbing, electrical, and HVAC, and up to ten years for major structural components. In practice, the one-year tier matters most, because that is when cosmetic and installation defects surface.
Request the full warranty documentation, not a summary, and read the claim process and exclusions carefully. Some warranties require written notice within a set window, and missing that window can void coverage for an otherwise legitimate defect. Also ask who performs repairs: the builder’s own team or the original subcontractors.
Essential Questions to Ask the Townhome Developer
A prepared buyer asks technical questions, and a trustworthy developer answers with documentation instead of verbal assurances. Before you close, get written answers to these:
Which third-party energy and indoor air quality certifications, such as ENERGY STAR, Indoor AirPlus, or DOE Efficient New Homes, will this townhome receive, and when will independent Rater verification occur?
Are the HVAC ducts located entirely within conditioned space, and what were the duct leakage test results?
How is the shared wall constructed, and what sound isolation does the assembly target?
What is the exact process for submitting a warranty claim, and who performs the repairs?
Is parking deeded to my unit, and are any spaces designed to be EV-capable or EV-ready?
When does association control transfer from the developer to residents?
Builders who welcome this level of scrutiny are showing confidence in their process. Those who deflect or offer vague verbal commitments are telling you something important about what to expect after closing. A written question list also removes the emotional pull of the model home, where staging and sales pressure can crowd out the technical evaluation you actually need.
Buyers who arrive with specific, documented questions tend to have clearer expectations, fewer post-closing surprises, and a stronger negotiating position when deficiencies surface.
Frequently Asked Questions About Buying a New Build Townhome
What should I include in my new home construction walkthrough checklist?
Start with the primary finishes: look for drywall cracks, uneven paint, and gaps at trim transitions, which can be early signs of rushed work. Test every outlet with a phone charger, confirm every light fixture works, run every faucet, and flush every toilet to check for leaks or slow drainage. Open, close, and lock every window and exterior door, noting any hardware that feels loose or misaligned. Bring a printed punch list and photograph every deficiency before you leave.
What should I know before buying a townhome?
Review the association’s covenants, conditions, restrictions, and bylaws before making an offer, not after. Understand exactly which maintenance responsibilities belong to the association, since roofs, siding, and common areas are common obligations but the boundaries vary by community. Ask how the shared walls are built, visit at different times of day to gauge noise, and confirm any rules on parking, pets, or short-term rentals that would affect how you plan to use the home.
What are must-haves in a new build?
Energy-efficient mechanical systems and well-installed insulation affect operating costs most directly. Smart home wiring, programmable thermostats, and pre-wired networking are far cheaper to include during construction than to retrofit. An open floor plan and ample storage, such as walk-in closets and a dedicated pantry, shape daily livability more than most buyers expect. Durable, low-maintenance exterior materials such as fiber cement siding and composite trim reduce the cost of ownership over a 10 to 20 year horizon.
What are the first things to do when moving into a newly built home?
Change the locks right away, because construction sites involve many subcontractors with key access. Clean away construction dust, which collects in filters, ductwork, and cabinets. Test every smoke and carbon monoxide detector, and locate the main water shut-off valve and electrical panel before you need them in an emergency. Set up utilities and internet service before move-in day so you are not troubleshooting while unpacking.
Is a pre-drywall inspection worth it on a new townhome?
Yes. Once drywall goes up, framing, air sealing, insulation placement, duct routing, and in-wall plumbing and wiring are hidden for good. An independent inspector with new construction experience can document problems while they are still easy and inexpensive for the builder to correct. Programs such as DOE Efficient New Homes also build a pre-drywall Rater inspection into their verification process.
Take the Guesswork Out of Your Townhome Purchase
A structured checklist and a prepared set of questions remove the guesswork from one of the largest financial decisions most people make. The model home will always look better than the base-price unit, and the checklist is what keeps you grounded in what you are actually buying. When you want a team that brings the same attention to structural integrity, energy performance, and craftsmanship to every project, Rite-Way Custom Homes can walk you through the process.
Attached living carries a common myth: sharing walls with neighbors means giving up the grand scale and quiet sanctuary of a detached estate. For buyers moving from large single-family homes, that concern is legitimate and worth taking seriously. The good news is that thoughtful luxury townhome design treats space, privacy, and quiet as engineering problems with proven solutions, so an attached home can feel every bit as generous and secluded as a standalone residence.
How Luxury Townhome Design Creates a Greater Sense of Space
Achieving an expansive feel in an attached home starts with architecture that prioritizes vertical volume over raw floor area. Square footage tells you how much space exists on paper. Volume tells you how that space registers the moment you walk through the front door.
Why Volume Matters More Than Square Footage
A room with generous ceiling height and unobstructed sightlines reads as larger than a room with more square footage but a compressed, cluttered visual field. This is spatial psychology at work, and it is one of the most powerful tools available in modern townhome construction.
Think of your home like a gallery: the eye travels upward along clean lines, making each room feel taller than it is. When a builder removes unnecessary walls, aligns doorways to create unbroken visual corridors, and introduces architectural details that draw the gaze vertically, the result is a residence that feels considerably larger than its physical dimensions suggest.
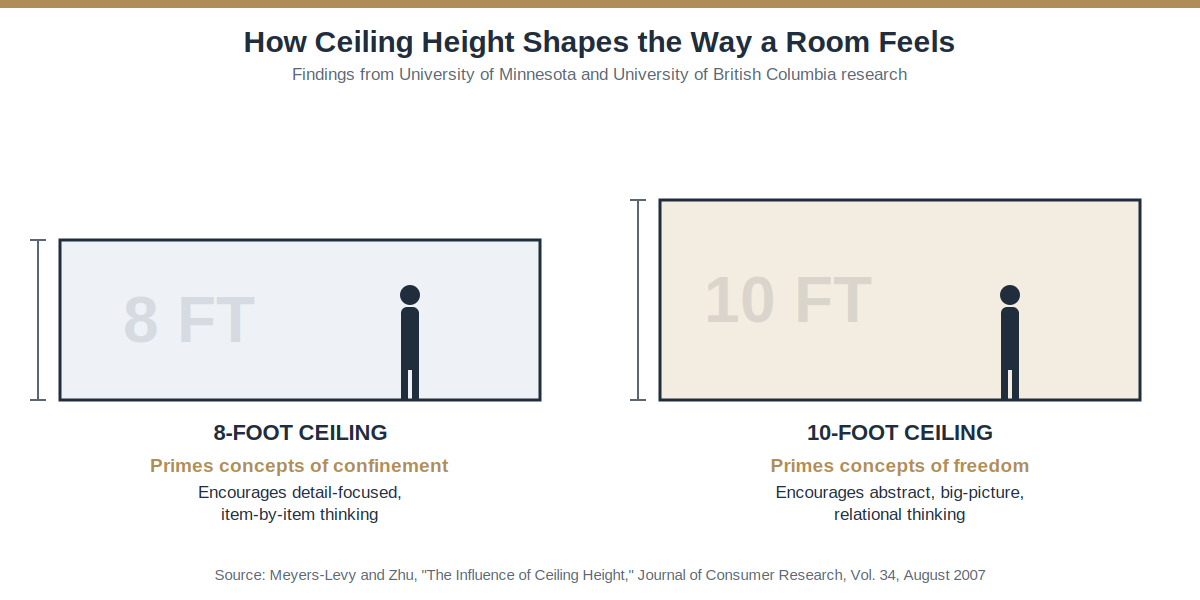
Research supports the effect. University of Minnesota and University of British Columbia researchers found that a higher ceiling primes concepts of freedom, while a lower ceiling primes concepts of confinement, and that people in a 10-foot room tended to think more freely and abstractly than people in an 8-foot room.
For downsizers leaving a larger estate, the fear of feeling confined is real. Precision in architectural design addresses it directly by leveraging vertical volume, strategic window placement, and open circulation paths. The goal is not to disguise the footprint but to shape every element so the space you do have is experienced at its fullest.
Using Light, Sightlines, and Ceiling Height to Open Up an Attached Home
Natural light is the single most powerful spatial amplifier available to a residential architect. Rooms flooded with daylight feel airy and boundless, while the same room with poor light reads as cramped regardless of its actual size. The right ratio of glass to wall surface depends on orientation, neighboring structures, and privacy requirements, so it is always a design judgment rather than a formula.
Generous window-to-wall ratios: Glazing on end walls maximizes daylight and visually expands the boundaries of each room.
Central light wells and skylights: Light sources above open stairwells pull daylight deep into the core of a multi-story layout, brightening spaces that would otherwise feel dim.
Unobstructed visual corridors: Aligned interior doorways and glass railings let sightlines run from the front to the back of the home, creating depth that multiplies perceived space.
Elevated ceiling heights: Vertical volume communicates openness in a way that horizontal square footage alone cannot match.
Natural Light and Everyday Comfort
Homes filled with daylight and long, clear sightlines simply feel better to live in. Designing for that effect is not an aesthetic indulgence. It is a functional decision that shapes how you experience your home every single day, from the first coffee in the morning to the last light at dusk.
Want a deeper look at layout strategy, daylighting, and privacy planning? Our free guide shares expert tips for designing a custom home from the first sketch.
The layout of your home dictates how naturally you move through it day to day. Standard townhomes often feel narrow because rigid, compartmentalized rooms block light and restrict movement. The hallway becomes a bottleneck, and the living areas feel like isolated cells rather than one connected whole.
Spacious layouts depend on easy movement, so high-traffic areas stay open and fluid. Modern plans connect living, dining, and kitchen areas into a cohesive, breathable environment where movement feels effortless. Settling these decisions early, during a thoughtful concept design process, is what keeps a layout from feeling improvised later.
Multi-level zoning: Active social areas on the main floor and quiet private suites above mirror how you use the home across the day.
Open-riser staircases: Light and sightlines pass directly through the center of the home, removing visual weight from the vertical core.
Indoor-outdoor extensions: Covered terraces, private courtyards, or rooftop decks visually double your living space and blur the line between inside and out.
Dedicated storage zones: Walk-in pantries, mudrooms, and built-in drop zones keep daily clutter out of the main living areas.
Every one of these choices compounds. A home with good vertical volume, a well-zoned plan, and a real connection to outdoor space produces a lived experience that feels qualitatively different from a standard attached home.
Privacy Features That Matter in Attached Homes
True luxury is defined as much by what you do not see or hear as by what you do. Creating privacy in an attached home requires a deliberate approach to site planning and exterior architecture from the earliest stages, rather than an afterthought applied through landscaping or window treatments once the structure is built. Strategic orientation of windows and outdoor living areas keeps your private spaces from overlooking neighboring properties, preserving peace without sacrificing daylight or outdoor connection.
Buyers of high-end residences expect their homes to feel like secluded retreats. In an attached configuration, that means offset entryways, private courtyards, and architectural projections that block lateral sightlines. When these elements are integrated from the start, the townhome feels detached from the world around it, not because the neighbors have disappeared, but because the architecture ensures your experience of the home never intersects with theirs. Our family-owned team plans these details with each client from day one.
Offset front entries: Recessed or angled doorways prevent direct views from the street or neighboring porches and create an immediate sense of arrival.
High-set and clerestory windows: Abundant daylight enters while living spaces stay shielded from outside eyes.
Layered landscaping and masonry walls: Dense plantings and custom masonry create visual barriers around patios and soften sightlines.
Smart security integration: Smart locks, controlled access, and integrated security systems give you full control over who enters your environment.
Luxury Townhome Design Strategies for Shared Walls
Shared walls should not mean shared noise. Proper construction creates walls that keep a neighbor’s television out of your living room, and the mechanics behind that result are well understood by experienced builders.
Luxury Townhome Design Details That Reduce Shared-Wall Noise
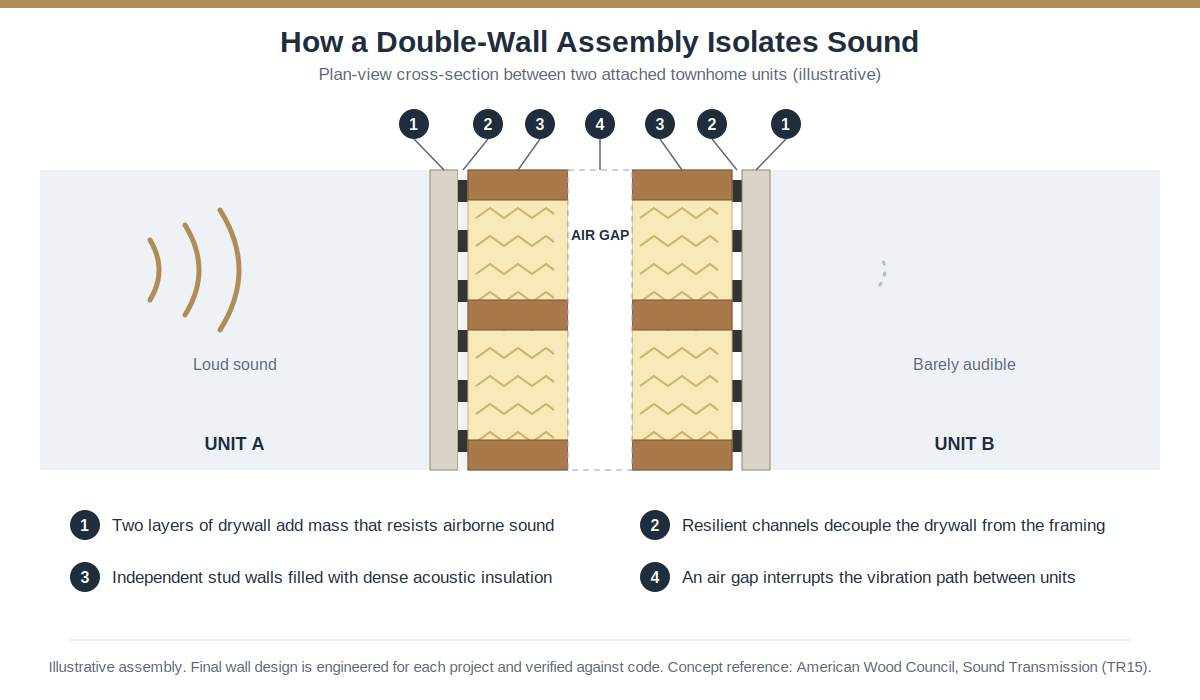
High-end townhome construction does not rely on a standard single-layer drywall assembly. Instead, it uses independent double-wall framing, where each unit’s wall is physically separated from its neighbor’s by an air gap. That gap is the critical variable. Sound travels as vibration through solid material, and an air gap interrupts the transmission path before the vibration reaches the adjacent framing.
Beyond the air gap, resilient channels, which are metal strips that decouple the drywall from the framing, absorb residual vibration before it reaches the wall surface. Dense acoustic insulation fills the cavity on both sides. The result performs not because of a single material but because of a layered system in which each component addresses a different path of sound transmission. That is the difference between a wall that muffles noise and one that genuinely isolates it.
What Building Codes Require Between Units
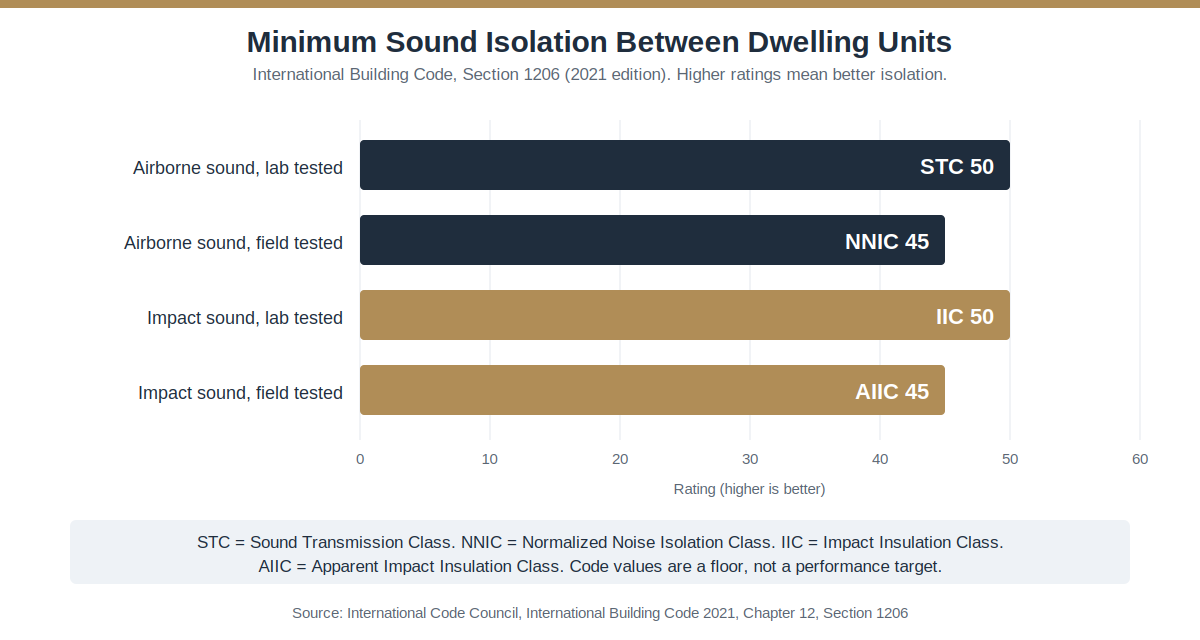
The International Building Code sets a clear floor for sound isolation between dwelling units. Walls and floor-ceiling assemblies must reach a Sound Transmission Class of at least 50 when lab tested, or a Normalized Noise Isolation Class of at least 45 when tested in the finished building. Floors must also meet impact ratings. You can review the requirements in Chapter 12 of the International Building Code.
Code values are a minimum, not a finish line. A margin above the minimum is a sensible goal for any residence at this level, and it starts with the wall design, continues through careful detailing around outlets and penetrations, and ends with construction quality on site. To discuss how advanced acoustic engineering fits your project, request a personalized consultation with our team.
Storage and Zoning Ideas That Reduce Visual Clutter
Structural decisions lay the foundation for an open, quiet home, but how you organize and zone the interior determines how calm it feels day to day. Just like a well-organized closet, your home should have a place for everything so the space feels settled rather than perpetually in motion. Visual clutter is one of the most underestimated contributors to the feeling of confinement. A room with generous dimensions but no dedicated storage for everyday objects reads as smaller and more chaotic than a space where everything has a home.
In a thoughtfully planned townhome, storage is not carved out of leftover square footage. It is an integrated part of the architectural program.
Built-in cabinetry: Custom millwork along underused wall runs adds capacity without adding visual weight.
Concealed mechanical spaces: Utility equipment is tucked away from the rooms where you spend your time.
Mudroom and drop-zone areas: Entry storage catches shoes, bags, and packages before they reach the main living areas.
Grouped utility functions: Laundry, storage, and mechanical needs sit together, creating a clear separation between the working parts of the house and the living parts.
There is also a practical dimension. In an attached home where outdoor storage is limited, interior storage planning carries more weight than it does in a detached house with a full basement and a three-car garage. Builders who understand that constraint from the outset can allocate storage intelligently across every level, so the absence of a sprawling garage never registers as a loss. If you are weighing a ground-up residence, our custom home building process shows how these decisions are coordinated from the first drawing to the final walkthrough.
Space and Privacy Features at a Glance
Design Feature
How It Adds Space
How It Adds Privacy or Quiet
Elevated ceiling heights
Increases vertical volume and perceived openness
Supports separation of social and private levels
Offset or recessed entries
Creates a defined arrival sequence
Blocks direct views from the street and neighboring porches
Open-riser staircases
Lets light and sightlines pass through the core
Keeps upper-level suites visually separate
Double-wall framing with air gap
Keeps living areas calm and free of noise intrusion
Interrupts sound transmission between units
Private courtyards and terraces
Extends living space outdoors
Shields outdoor areas from lateral sightlines
Integrated storage
Reduces visual clutter in living areas
Keeps utility functions out of social spaces
Questions to Ask a Builder Before You Commit
Not every attached home is designed with the same care. Before choosing a builder, ask questions that reveal how seriously they treat space, privacy, and sound:
How is the shared wall framed, and is there an air gap between the two wall structures?
What sound isolation rating does the wall assembly target, and how is it verified?
How are entries, windows, and outdoor areas oriented to protect privacy?
What ceiling heights are planned on each level?
Where will daily storage live so the main living areas stay uncluttered?
Who coordinates architecture, engineering, and construction so details are not lost between teams?
Clear, specific answers are a strong sign that a builder understands the difference between an attached home that merely meets code and one that lives like an estate.
Frequently Asked Questions About Luxury Townhomes
Why are townhouses harder to sell?
Standard townhouses can face resale friction when buyers worry about association fees, restrictive covenants, or shared-wall noise. Thoughtful luxury townhome design reduces the noise and privacy concerns at the source, through independent wall systems, offset entries, and private outdoor space. That makes the home easier to see as a premium residence rather than a compromise, and buyers who understand the construction quality tend to recognize the difference quickly.
What is the best luxurious house design?
There is no single answer, and any builder who says otherwise is oversimplifying. The designs that consistently earn the strongest response prioritize open, light-filled layouts, tall ceilings, integrated indoor-outdoor transitions, and high-end natural materials used with restraint. A custom luxury townhome can include every one of these elements. The configuration is different from a standalone estate, but the experience does not have to be.
What is a fancy name for a townhouse?
Depending on architectural style and regional history, sophisticated terms include “row house,” “terrace house,” “maisonette,” and “brownstone.” Each carries its own geographic and historical associations, but all describe the same basic type: a multi-story attached residence with its own private entrance.
What are the disadvantages of living in a townhouse?
Traditional drawbacks include limited yard space, shared-wall noise, and less exterior autonomy. In luxury townhome design, each is addressed directly. Private terraces and courtyards stand in for a yard, double-wall acoustic systems tackle the noise concern, and association-managed exterior maintenance, where it applies, removes routine upkeep. The trade-offs that define a standard townhouse are largely design problems, and design problems have design solutions.
How much sound should a townhome wall block?
The International Building Code requires walls between dwelling units to reach a Sound Transmission Class of at least 50 when lab tested, or a Normalized Noise Isolation Class of at least 45 when field tested. Those numbers are a minimum. A margin above the minimum is a sensible goal for a luxury residence.
Design a Townhome That Lives Like an Estate
Choosing a luxury townhome does not mean accepting a smaller life. It means living better. Through advanced acoustic engineering, strategic floor plan choices, and a deep understanding of spatial psychology, a custom-built townhome becomes a quiet, expansive sanctuary calibrated to your lifestyle. The buyers who discover this tend to stop thinking of it as a compromise and start thinking of it as a preference: a home with the scale and serenity they want, without the maintenance burden they were ready to leave behind.
To take the next step toward a home that balances open, light-filled spaces with absolute privacy, explore our full range of building and remodeling services. Rite-Way Custom Homes is ready to bring your vision to life.
Ask five contractors for a quote on the same project and you may get five different numbers, sometimes tens of thousands of dollars apart. That gap is not a sign that someone is trying to take advantage of you. It reflects how many separate categories get folded into a single estimate, and how differently builders itemize them. Understanding true home addition cost starts with knowing which expenses show up in a quote and which ones tend to surface only after construction is underway.
Physical materials, the “hardware” of a project, are only one line in that quote. Design work, permitting, labor, and administrative overhead often account for a larger share of the total than most homeowners expect, and they are the items most likely to catch you off guard. Below is a breakdown of where the money actually goes, what recent federal rebate changes mean for a 2026 project, and how a structured design process keeps the number in your contract close to the number you actually pay.
Key Takeaways
Hard Costs vs. Soft Costs: materials are only part of the number. Design, permitting, and labor make up a large share of total home addition cost.
Utility Upgrades Add Up: expanding your footprint often means upgrading your electrical panel, wiring, and HVAC capacity to handle the added load.
Federal Rebates Changed for 2026: several tax credits that used to appear in addition budgets expired at the end of 2025, while a separate income-qualified rebate program remains active in many states.
Design-First Planning Pays Off: detailed drawings and 3D modeling before construction begins is the most reliable way to prevent the change orders that push a budget past its estimate.
What Drives Home Addition Cost: Hard Costs vs. Soft Costs
When a contractor hands you a number, two very different categories of spending are baked into it, whether the estimate spells them out or not. Hard costs cover the physical components that go into the finished space: framing lumber, drywall, windows, roofing, flooring, and fixtures. These are the parts you can see and touch once the crew packs up.
Soft costs cover everything else it takes to get there. According to NAHB’s 2024 Construction Cost Survey, even a full new-construction build allocates only 64.4 percent of its total sales price to pure construction spending, with the rest going to the finished lot, financing, overhead, marketing, sales commission, and builder profit. A home addition follows a smaller version of the same pattern: architectural design, engineering, permitting, inspections, and labor sit alongside the materials, and they rarely show up as one obvious line.
A transparent proposal separates these categories so you know exactly where your money is going. When a bid quotes only a price per square foot with no breakdown, ask what it actually includes. National averages that circulate online are blended from many markets at once, and they rarely reflect your local labor rates, material costs, or subcontractor availability.
Square footage alone tells you very little about a final price. A bathroom, kitchen expansion, or laundry room is a “wet” space that requires extensive plumbing and electrical rough-in, while a bedroom or home office addition is a “dry” space that mostly needs framing, insulation, and finishes. If a kitchen bump-out is on the table, it helps to understand what a full kitchen remodeling project involves before deciding whether expanding the footprint or reconfiguring the existing one makes more sense.
Contingency requirements are just as site-specific. There is no universal percentage that applies across every home, soil condition, and project scope, which is exactly why a detailed design phase matters more than a rule of thumb.
Home Addition Cost by Project Type
Once hard and soft costs are separated, the next variable is what kind of room you are building. The ranges below reflect national, construction-only averages for 2025 and 2026 and vary significantly by region, finish level, and site conditions, so treat them as a starting point for a conversation rather than a quote.
Home Addition Cost per Square Foot
Addition Type
Typical Cost per Square Foot
Bedroom or home office (dry space)
$80 – $200
Bathroom addition (wet space)
$200 – $550
Kitchen expansion or bump-out
$250 – $600+
Second-story addition
$200 – $480
Garage conversion to living space
$60 – $150
Second-story additions carry their own premium regardless of finish level, since the existing first-floor walls and foundation typically need reinforcement to safely carry the new load. That structural work happens before a single interior finish is chosen, which is one reason building up tends to cost more per square foot than building out.
How Electrical, HVAC, and Utility Upgrades Affect Your Budget
Adding square footage to a home means adding load to everything behind the walls. Electrical panels, HVAC equipment, and plumbing infrastructure that comfortably served the original footprint may not have the capacity for an expanded one, and this is where a large part of the invisible budget lives.
Many older homes still run on 100-amp electrical service. A modern addition, especially one that includes a home office, dedicated appliances, or EV charging capability, typically needs 200-amp or larger service to keep up.
Utility items worth evaluating early:
Electrical Panel Upgrades: moving from older 100-amp service to 200-amp or 400-amp service to safely handle the new load.
Dedicated Circuit Installation: running new lines for heavy-use appliances or HVAC equipment in the addition rather than pulling from circuits that already serve the existing home.
Smart Thermostat Integration: pairing a new zone with smart climate controls, which can meaningfully reduce heating and cooling costs when configured correctly.
When a Ductless Mini-Split Beats Extending Your Existing System
HVAC needs its own planning entirely. Extending existing ductwork into a new space depends on your current system’s remaining capacity, duct configuration, and the addition’s orientation, and it is not always the most practical option. In many cases, a ductless mini-split system is more cost-effective than stretching a furnace or air handler that is already running near its limit.
Rebates and Incentives That Can Offset Your Home Addition Cost
A home addition creates a natural opportunity to install higher-efficiency mechanical systems, but the incentive landscape looks different in 2026 than it did even a year earlier, and it is worth knowing what actually still applies before building a rebate into your budget.
Two credits that used to appear in nearly every remodeling cost guide, the 30 percent federal tax credit for residential solar installations and the separate credit for battery storage, expired for any system placed in service after December 31, 2025. If a calculator or a contractor still lists either one as available for a 2026 project, that figure is outdated.
What remains active is a separate, income-qualified rebate program funded through the Inflation Reduction Act. Households at or below 150 percent of their area’s median income may qualify for point-of-sale rebates, and each state administers its own rollout and timeline, so availability varies by location and continues to expand through 2026 and into 2027. According to the U.S. Department of Energy’s Home Upgrades program, an ENERGY STAR-certified electric heat pump may qualify for a rebate up to $8,000, an electrical panel upgrade up to $4,000, wiring modifications up to $2,500, a heat pump water heater up to $1,750, and insulation or duct sealing up to $1,600.
The practical case for coordinating these upgrades with your addition, rather than treating them as a separate project later, still holds regardless of which credits are active in a given year. When electricians are already on-site running new circuits and the walls are open, the incremental cost of adding EV-charging-ready conduit or a heat pump line set is far lower than returning to do it as a standalone job.
Design-Build vs. Design-Bid-Build: Which Approach Protects Your Budget
The conventional design-bid-build model has a structural flaw that catches homeowners off guard partway through. An architect designs a space based on a wish list, and only then does it go out to bid. When the bids land higher than expected, you are left cutting scope you spent months developing or accepting a number you were not prepared for.
Design-build resolves this by combining architectural design, engineering, and construction under a single contract, so cost implications surface while decisions are still being made instead of after the drawings are finished. A structured concept design process that uses CAD drawings, 2D plans, and 3D modeling lets you walk through the space, evaluate ceiling heights and window placement, and confirm pricing before a permit is ever filed.
This precision has a direct financial payoff: it eliminates most of the change orders that occur after construction begins, which are one of the most common drivers of budget overruns on residential projects. Every decision made during design is a decision that does not carry a field-labor premium later.
“As a Keller Williams Realtor, when my clients have construction, building code, or zoning questions, my go-to builder is Marv Ritter at Rite-Way Custom Homes. Marv and the Rite-Way team are well versed in new construction, additions, and remodeling, and they have published four books designed to help potential clients better understand the key issues, insightful, helpful, and well written books that will help you save thousands on your new home, renovation, or addition. When my clients have questions about building a home, Marv is on speed-dial for me, always willing to help with any questions.”
Home Addition Cost vs. the Cost of Moving
Resale return on a home addition varies by market, addition type, and execution quality, and anyone who quotes you a precise percentage without knowing your home and your market is guessing.
According to the annual Cost vs. Value Report, a midrange bathroom addition recoups roughly 53 percent of its cost at resale, the strongest return of any addition category tracked, while a midrange primary suite addition recoups closer to 32 percent and an upscale version falls to around 18 percent. None of these numbers approach what a garage door replacement or a minor kitchen refresh returns, and that is normal. Additions are rarely justified by resale math alone.
The more useful comparison for most families is the addition against the cost of moving. Selling and buying again means real estate commissions, closing costs, moving expenses, and often a higher mortgage rate on the next home, expenses that frequently add up to more than the gap an addition closes. A well-designed addition lets a family stay in a community and a home they already know while gaining the space they actually need, a return that no resale percentage captures.
“We were looking for a very particular home, where we could age in place. Marv and Walt spent about 12 hours over 4 sessions listening and looking at concept photos, and chose an architect who nailed our design concept, taking the extra time to tour the neighborhood and make sure the house fit. They were willing to work with outside craftspeople and treated us as partners in the process. Terry was quick to respond to inquiries. Their craftsmanship and quality is outstanding. As a result, we have a house that is both functional for our needs and stunning.”
Hidden Costs and Contingency Planning
Once walls open, conditions behind them are rarely exactly what anyone expected: outdated wiring that does not meet current code, structural gaps invisible in the original plans, or soil conditions that complicate foundation work. These are not signs of a bad contractor. They are the nature of working with an existing structure, especially one that is decades old.
There is no single national standard for contingency size. What is appropriate depends on your home’s age, the complexity of the addition, and how much of the existing structure gets disturbed. What is consistent across projects is that homeowners without a dedicated financial buffer face the most stress when something unexpected surfaces.
“Remodeling is never problem-free and unanticipated issues always arise. Marv and Walt were very open and understanding as issues arose. Our village building inspectors were also aware of Rite-Way, and once they discovered Rite-Way was our general contractor, the inspections went very smoothly. We had only one issue arise during our warranty period, and Walt followed through on a timely and professional basis and resolved it quickly and professionally with the subcontractor.”
How to Choose a Home Addition Contractor
The contractor you choose determines more than the quality of the finished product. It determines how the entire process feels to live through, and a home addition is a months-long disruption to a household.
Longevity matters. A company that has operated in the same region for decades has established relationships with local building inspectors, a subcontractor network vetted over time rather than assembled for a single job, and firsthand experience with how zoning and permitting actually work on the ground, not just on paper. Reviewing a builder’s full range of remodeling and addition services can tell you a lot about how well a company understands the trades your specific project will touch.
Confirm that any contractor under consideration is fully licensed, bonded, and carries complete general liability and workers’ compensation insurance. This is not a formality. It is what protects you if something goes wrong on your property. Choosing an unlicensed or uninsured contractor to save money upfront carries real structural and financial risk, including code violations and failed inspections that end up costing more than the original savings.
Questions to Ask Before You Sign
Local Experience: a proven history managing municipal inspections and zoning requirements in your area.
Detailed Estimates: a clear, line-item breakdown of hard versus soft costs rather than one vague number.
Subcontractor Quality: established relationships with plumbers, electricians, and finish trades who stand behind their work.
Dedicated Point of Contact: a specific project manager who knows your job, not a rotating cast of unfamiliar faces. Ask who will serve as your dedicated point of contact for the life of the project.
If a wet-space addition is on your list, comparing notes with a company’s own bathroom remodeling work is a good way to judge how carefully they handle plumbing and waterproofing before you commit to a contract.
Frequently Asked Questions About Home Addition Cost
Why is there such a wide range in per-square-foot home addition cost?
Square footage is only a starting point. Room type dictates a large part of where a project lands: “wet” spaces like bathrooms and kitchens need extensive plumbing and electrical rough-in that a “dry” bedroom addition does not. Finish level compounds this further, and structural work such as reinforcing a foundation or tying into older framing adds another layer that no national average can capture.
Can I lower my home addition cost by hiring a less experienced general contractor?
It can backfire. Older homes in particular often need specialized engineering to connect new construction safely to existing structures. A contractor unfamiliar with local zoning and inspection protocols can produce code violations and failed inspections, and the remediation work frequently costs more than the original savings, on top of the schedule delay of redoing work that did not pass review.
How do I keep my project from going over budget once construction starts?
The most effective protection is a thorough design phase before a shovel goes in the ground. Locking in CAD drawings, 3D modeling, and material specifications ahead of time removes the moving-target problem, since decisions made during design do not carry the field-labor premium of decisions made mid-construction. A dedicated contingency fund alongside the primary budget covers what a design phase cannot predict.
What is the difference between hard costs and soft costs in a home addition?
Hard costs are the physical materials installed in your home: lumber, drywall, roofing, windows, and fixtures. Soft costs cover everything else: architectural design, structural engineering, permits, inspections, labor, and financing. Both categories are real, and both belong in your budget from day one.
Are federal rebates still available for energy upgrades bundled into a home addition?
Some are. The 30 percent tax credits for residential solar and battery storage expired for systems placed in service after December 31, 2025. A separate, income-qualified rebate program funded through the Inflation Reduction Act is still active, offering up to $8,000 for a qualifying heat pump and up to $4,000 for an electrical panel upgrade, though availability depends on household income and your state’s rollout schedule.
Does a home addition pay for itself when I sell?
Rarely in full. Industry resale data consistently shows additions recouping a portion of their cost rather than all of it, with bathroom additions typically performing best among addition categories. Most families justify an addition by comparing it to the cost and disruption of moving rather than expecting it to break even at resale.
Planning a home addition is one of the larger financial decisions many homeowners make, and the complexity behind the number is entirely real. Having a team that itemizes every cost, plans for the utility work behind the walls, and builds in a genuine contingency means you are not navigating that complexity alone. Schedule a consultation with Rite-Way Custom Homes to start planning your project with a clear, honest number from the beginning.
Building a custom home, completing a major renovation, or adding substantial living space involves many interconnected decisions. Having the home design build process explained clearly can help homeowners understand what to expect, how decisions are made, and why working with one coordinated team can make the experience more efficient. The design-build approach combines design, planning, budgeting, permitting, and construction under a unified process. Instead of managing separate architects, designers, engineers, and contractors independently, homeowners work with a team that collaborates from the earliest concepts through final completion.
What Is the Design-Build Approach?
Design-build is a project delivery method in which one company or coordinated team manages both the design and construction portions of a project. This differs from the traditional design-bid-build model, where an architect completes the plans before contractors submit bids. Under the traditional model, the designer and builder may have limited communication until construction is about to begin.
With design-build, the builder participates in the planning process from the start. This allows the design team to evaluate construction methods, material availability, scheduling considerations, and budget implications while the plans are still being developed. The result is a more collaborative process in which design goals and practical construction requirements are considered together. According to the National Association of Home Builders, this integrated delivery method has become increasingly common for complex residential projects.
For luxury custom homes and major renovations, this collaboration can be especially valuable. High-end residential projects often involve complex architecture, specialized materials, custom millwork, sophisticated mechanical systems, and carefully coordinated interior details. Early communication among all parties helps reduce surprises and keeps the project aligned with the homeowner’s priorities.
Step 1: Initial Consultation and Project Discovery
The first step is an introductory meeting with the design-build team. This conversation allows the builder to learn about the homeowner’s vision, lifestyle, property, priorities, and general expectations. It also allows the homeowner to learn about the company’s experience, communication style, process, and approach to craftsmanship.
During the initial consultation, the team may discuss:
Whether the project is a new custom home, addition, or renovation
The preferred architectural style
The homeowner’s functional needs
Desired square footage
Important rooms and features
The condition or location of the property
General budget expectations
Preferred timing
Long-term plans for the home
Homeowners do not need to have every detail determined at this stage. The purpose is to establish the broad scope of the project and determine whether the design-build team is a good fit. For a renovation or addition, the builder may also ask about existing problems in the home, such as limited space, an outdated layout, insufficient storage, or poor connections between indoor and outdoor areas.
Step 2: Property and Existing-Condition Evaluation
After the initial conversation, the design-build team evaluates the property. For a new custom home, this may include reviewing the lot, zoning requirements, setbacks, topography, utilities, drainage, access, and neighborhood guidelines. The team may also consider how the home can be positioned to take advantage of natural light, views, privacy, and outdoor living opportunities.
For additions and major renovations, the evaluation typically includes a close inspection of the existing home. The builder may examine the foundation, framing, roofing, plumbing, electrical systems, heating and cooling equipment, and structural conditions. Measurements and photographs may also be taken to document the current layout.
This step helps identify constraints that could influence the design. For example, an addition may require structural reinforcement, utility relocation, or updates to older systems. Identifying these conditions early allows the design team to create a more realistic plan and budget.
Step 3: Establishing the Project Program
The project program is a detailed list of the spaces, features, and performance goals that the design must address. It converts the homeowner’s ideas into a more organized set of requirements.
For a new luxury home, the program may include:
Number and size of bedrooms
Primary suite features
Kitchen layout and appliance needs
Home office requirements
Formal and informal entertaining spaces
Mudroom and laundry areas
Fitness or wellness rooms
Wine storage
Finished basement spaces
Garage size and configuration
Outdoor kitchens, patios, or screened rooms
Smart-home technology
Energy-efficiency goals
Accessibility or aging-in-place considerations
For a renovation, the program may focus on improving flow, enlarging specific rooms, creating additional storage, updating finishes, or adapting the home to changing family needs. A thorough project program gives the design team a clear foundation for developing the plans.
Step 4: Preliminary Budget Planning
Budget planning begins early in the design-build process. Rather than waiting until the plans are complete, the builder provides cost guidance as the design evolves. This allows the homeowner to understand how decisions related to square footage, architectural complexity, materials, systems, and site conditions may affect the overall investment.
At this stage, the budget is often presented as a preliminary range rather than a final contract amount. The range may include allowances or assumptions for major categories such as cabinetry, appliances, flooring, plumbing fixtures, lighting, landscaping, and specialty features.
Early budget discussions help the team prioritize the elements that matter most. If a homeowner values a highly detailed kitchen, custom millwork, expansive windows, and premium outdoor living spaces, the design and budget can be developed around those priorities. Value engineering can also occur before construction begins, when adjustments are easier and less disruptive.
Step 5: Conceptual Design
Once the project goals and preliminary budget are established, the design team begins creating initial concepts. These may include floor plans, exterior elevations, site layouts, sketches, and three-dimensional renderings.
Conceptual design focuses on major decisions such as:
Room placement
Traffic flow
Overall size
Relationship between indoor and outdoor spaces
Architectural character
Window placement
Ceiling heights
Rooflines
Garage location
Major exterior materials
Homeowners review the concepts and provide feedback. The design may go through several revisions as ideas are refined. This collaborative stage is important because it establishes the overall direction of the project before detailed construction documents are prepared.
Step 6: Design Development
During design development, the approved concept becomes more detailed. The team begins specifying materials, dimensions, structural requirements, building systems, and interior features. Engineers and specialty consultants may become involved depending on the complexity of the project.
Design development may address:
Foundation and framing systems
Plumbing and electrical layouts
Heating, cooling, and ventilation
Window and door selections
Roofing materials
Exterior cladding
Cabinetry plans
Stair and railing designs
Fireplace details
Ceiling treatments
Built-in storage
Interior trim and millwork
Lighting plans
Flooring and tile layouts
The builder continues reviewing the design for constructability and cost. This ongoing input helps ensure that the design can be built efficiently without compromising the homeowner’s vision.
Step 7: Interior Selections and Finish Coordination
Material and finish selections are a significant part of any luxury home project. Depending on the company, homeowners may work with an in-house designer or a trusted interior design professional. The selection process is typically organized into categories and scheduled to prevent delays.
Choices may include:
Cabinet styles and finishes
Countertop materials
Plumbing fixtures
Decorative lighting
Flooring
Tile
Paint colors
Hardware
Interior doors
Appliances
Fireplace surrounds
Closet systems
Wall treatments
Exterior finishes
A coordinated design-build process helps ensure that selections complement the architecture and fit within the established budget. It also allows the team to confirm lead times and place orders for specialized products well before they are needed on the jobsite.
Step 8: Construction Documents and Final Pricing
After the design is approved, the team prepares detailed construction documents. These drawings and specifications provide the information needed for permits, trade contractor pricing, material ordering, and construction.
The documents may include architectural plans, structural drawings, engineering details, electrical plans, plumbing layouts, mechanical information, interior elevations, and product specifications. The builder uses this information to develop a more precise project cost.
At this point, homeowners typically review a detailed proposal or construction agreement. The agreement may outline:
Scope of work
Project price or pricing structure
Allowances
Payment schedule
Estimated construction timeline
Change-order procedures
Warranty information
Responsibilities of each party
Careful documentation helps establish clear expectations before work begins.
Step 9: Permitting and Preconstruction Preparation
Before construction starts, the project must receive the required approvals. The design-build team generally coordinates the permit application process with the appropriate municipality. Depending on the location and scope, permits may be required for building, demolition, plumbing, electrical, mechanical, grading, or other work.
Preconstruction planning also includes developing the project schedule, confirming trade contractor availability, ordering long-lead materials, and establishing jobsite logistics. For renovations, the team may create a plan for protecting areas of the home that will remain occupied or untouched.
The preconstruction phase is essential because it prepares the project for an organized start. A detailed plan reduces uncertainty and helps trades, suppliers, and homeowners understand the upcoming sequence of work.
Step 10: Site Preparation and Construction
Construction begins with site preparation. For a new home, this may include clearing, excavation, utility work, grading, and foundation construction. For an addition or renovation, preparation may involve selective demolition, temporary supports, dust containment, and protection of existing finishes.
The construction sequence generally includes:
Foundation work
Structural framing
Roofing
Window and exterior door installation
Plumbing, electrical, and mechanical rough-ins
Insulation
Drywall
Interior trim
Cabinetry
Tile and flooring
Painting
Plumbing and electrical fixtures
Exterior finishes
Landscaping and hardscaping
The exact sequence varies depending on the project. Throughout construction, the project manager coordinates trades, monitors quality, tracks the schedule, and communicates with the homeowner.
Step 11: Ongoing Communication and Quality Control
Clear communication is one of the most important elements of a successful design-build project. Homeowners need regular updates regarding progress, upcoming decisions, schedule changes, and budget considerations.
A professional design-build team may provide updates through meetings, phone calls, emails, project management software, or written progress reports. Homeowners may also participate in scheduled walkthroughs at major construction milestones.
Quality control occurs throughout the project rather than only at the end. The builder reviews workmanship, verifies that materials match the specifications, and ensures that work complies with the plans and applicable codes. Any issues can then be addressed before later phases make corrections more difficult.
Step 12: Managing Changes During Construction
Even with careful planning, homeowners may decide to change certain features after construction begins. Unexpected site or structural conditions can also require modifications, particularly during renovations.
A formal change-order process documents:
The requested change
The reason for the change
The cost impact
The schedule impact
Required approvals
Written change orders help prevent confusion and ensure that everyone understands how a decision affects the project. Homeowners can minimize unnecessary changes by making selections early and reviewing the plans carefully before construction starts.
Step 13: Final Walkthrough and Punch List
As construction nears completion, the builder performs detailed inspections and prepares the home for turnover. The homeowner participates in a final walkthrough to review the completed work.
During the walkthrough, the team creates a punch list of minor items that need correction or adjustment. These may include paint touch-ups, hardware adjustments, finish repairs, or final cleaning details. The builder coordinates the completion of these items before or shortly after occupancy, depending on the agreement.
Final inspections may also be required by the municipality before a certificate of occupancy is issued. The project cannot be considered fully complete until all required approvals have been received.
Step 14: Homeowner Orientation and Project Completion
The final stage includes introducing the homeowner to the home’s systems and features. The builder may explain how to operate heating and cooling equipment, smart-home controls, appliances, lighting systems, fireplaces, security features, and other specialized components.
Homeowners may also receive:
Product manuals
Warranty documents
Maintenance recommendations
Paint and finish information
Subcontractor contacts
Final plans or specifications
Instructions for seasonal maintenance
A reputable builder remains available after completion to address warranty questions and help homeowners understand how to care for the property. This ongoing relationship can be especially valuable in a custom home with specialized systems and materials.
Benefits of the Home Design-Build Process
The design-build approach offers several advantages for homeowners undertaking complex residential projects. Bringing design and construction professionals together early creates a more integrated experience.
Potential benefits include:
One primary point of responsibility
Earlier and more accurate budget input
Better coordination between design and construction
Faster decision-making
Fewer communication gaps
Improved constructability
More efficient scheduling
Greater consistency from concept through completion
A collaborative approach to problem-solving
The success of the process still depends on choosing an experienced team. Homeowners need a builder with strong design knowledge, reliable trade relationships, transparent communication, and a demonstrated commitment to quality.
Frequently Asked Questions
How long does the home design-build process take?
The timeline depends on the size, complexity, location, permitting requirements, and material selections. A major renovation may take several months, while a fully custom luxury home can require a year or longer from initial planning through completion.
When is the final project price determined?
Preliminary budget guidance begins early, but detailed pricing is typically finalized after the design, specifications, engineering, and major selections are sufficiently developed.
Can design-build be used for renovations and additions?
Yes. The process works well for new homes, luxury additions, whole-home renovations, kitchen expansions, primary suite additions, finished basements, and other substantial residential projects.
Do homeowners still have control over the design?
Yes. Design-build is collaborative. Homeowners provide input throughout the planning, design, material selection, and construction phases.
What happens if unexpected conditions are discovered?
The builder evaluates the condition, explains the available solutions, and documents any effect on cost or scheduling through the project’s change-order process.
Are architects and engineers involved in design-build projects?
They may be. The exact team depends on the project. Custom homes and structural renovations often require architectural, structural, civil, mechanical, or other professional expertise.
How can homeowners prepare for the design-build process?
Homeowners can begin by identifying their priorities, gathering inspiration, considering their long-term needs, establishing a realistic investment range, and choosing a builder with relevant experience.
What is the homeowner’s role during construction?
The homeowner reviews updates, approves selections, responds to questions, attends key meetings, and makes timely decisions. The builder manages daily construction activities and trade coordination.
Build or Transform Your Home With Rite-Way Custom Homes
A successful custom home or major renovation begins with a thoughtful process, experienced leadership, and close attention to every detail. At Rite-Way Custom Homes, we specialize in extraordinary custom homes, luxury additions, and major renovations for discerning homeowners. Whether you are planning to build your dream home from the ground up, expand your current living space, or transform an existing property with high-end renovations, our team can guide your project from the earliest design ideas through final construction.
For more than 30 years, we have built some of the most beautiful custom homes for our clients. Our commitment to quality, integrity, personalized service, expert craftsmanship, and careful project coordination has made us a trusted name in luxury home building. Contact us to begin creating a home that reflects your style, supports your lifestyle, and exceeds your expectations.
The best luxury bathroom remodel ideas combine sophisticated design with improvements that make the space more comfortable, functional, and durable. A high-end bathroom renovation is not simply about selecting expensive finishes. It involves thoughtful space planning, quality materials, custom features, and skilled installation that work together to create a refined environment. Homeowners may also benefit from improvements that address storage, lighting, accessibility, energy efficiency, and everyday convenience. By focusing on upgrades that deliver both visual impact and practical value, you can create a bathroom that feels luxurious now and continues to serve your household for years.
Begin With a Thoughtful Bathroom Layout
A successful luxury bathroom remodel begins with the layout. Even the most beautiful tile and fixtures can feel underwhelming when the room is cramped, poorly organized, or difficult to navigate. During a major renovation, it may be worthwhile to reconsider the placement of the shower, bathtub, vanity, toilet, windows, and storage areas. Adjusting the floor plan can improve traffic flow, create clearer functional zones, and make the room feel more open.
A well-designed layout also accounts for how the bathroom will be used by more than one person. In a primary suite, separate grooming stations, enclosed toilet areas, and divided storage can make busy mornings more comfortable. Wider walkways and properly positioned doors can reduce congestion. When space permits, creating distinct areas for bathing, dressing, and preparing for the day can give the bathroom the atmosphere of a private retreat.
Install an Oversized Walk-In Shower
A spacious walk-in shower is one of the most desirable features in a luxury bathroom. Unlike compact shower enclosures, an oversized shower provides room for multiple fixtures, built-in seating, storage niches, and architectural details. Frameless glass can help the room feel brighter and more open while keeping the focus on the tile and plumbing fixtures.
Popular features for a high-end shower include:
Multiple showerheads or adjustable body sprays
A handheld shower wand
A ceiling-mounted rainfall showerhead
A built-in bench
Recessed niches for toiletries
Linear drains
Slip-resistant flooring
Integrated lighting
Steam shower capabilities
Proper waterproofing is especially important when building a large custom shower. The quality of the work behind the finished surfaces is just as important as the visible tile. Experienced builders and remodeling professionals understand how to manage drainage, ventilation, moisture protection, and fixture placement so the shower remains attractive and dependable.
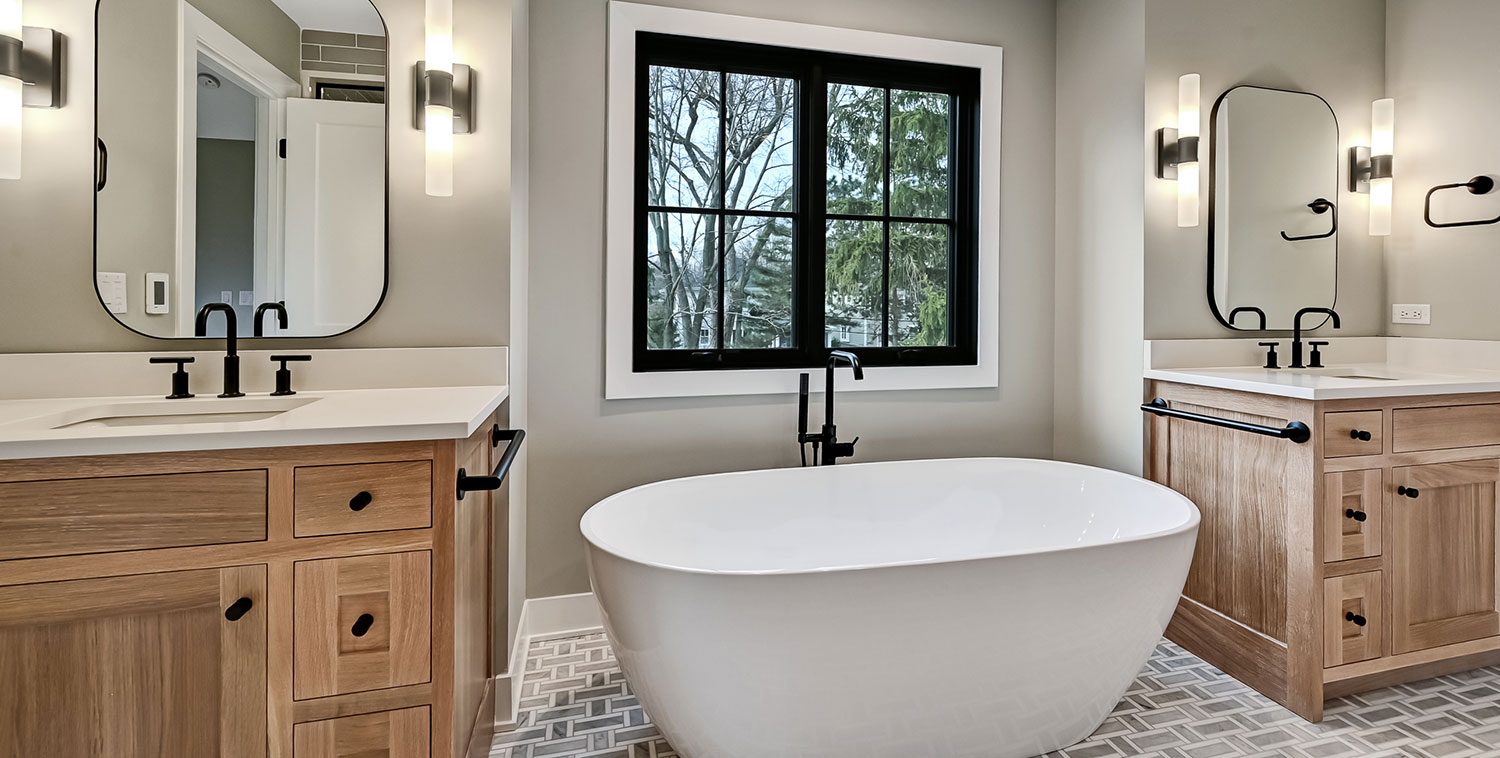
Add a Freestanding Soaking Tub
A freestanding soaking tub can create an elegant focal point while providing a comfortable place to relax. These tubs are available in sculptural shapes and a variety of materials, allowing homeowners to select a design that complements the broader architectural style of the home. A sleek oval tub may suit a contemporary bathroom, while a more traditional silhouette can enhance a classic or transitional space.
Before adding a freestanding tub, consider how often it will be used and whether the room can accommodate it comfortably. There needs to be enough clearance around the tub for cleaning and safe movement. The floor may also need to support the weight of the tub when it is filled with water. A well-planned installation may include a floor-mounted or wall-mounted tub filler, a nearby table or ledge, and soft lighting that contributes to a relaxing atmosphere.
Invest in Custom Bathroom Cabinetry
Custom cabinetry allows homeowners to create storage that fits the exact dimensions and needs of the bathroom. Instead of relying on standard vanity sizes, custom cabinets can be designed around windows, plumbing, architectural features, and personal routines. They can also incorporate furniture-style details that make the bathroom feel more connected to the rest of a luxury home.
Useful custom storage features may include:
Deep drawers for grooming tools
Built-in electrical outlets
Divided cosmetic organizers
Pull-out shelves
Hidden hampers
Linen towers
Drawer-mounted hair appliance storage
Medicine cabinets with interior lighting
Dedicated spaces for towels and toiletries
Quality cabinetry can also improve the room’s overall appearance. Carefully selected wood species, painted finishes, hardware, and millwork details can establish the design direction for the entire bathroom. Soft-close doors, durable drawer slides, and moisture-resistant finishes contribute to long-term performance.
Create a Double Vanity With Separate Grooming Areas
A double vanity is a practical addition to a shared primary bathroom, but luxury design takes the concept beyond simply placing two sinks side by side. Separate grooming areas can provide each person with dedicated storage, counter space, lighting, and electrical access. This arrangement helps reduce clutter and makes the bathroom easier to use at the same time.
Homeowners can choose between one continuous vanity or two individual vanity cabinets. Separate vanities may create a more customized look and can be positioned on different walls when the floor plan allows. A central storage tower, seated makeup area, or open shelving can add function without sacrificing style. Countertop materials such as natural stone, quartz, or porcelain can provide a polished surface that is also easy to maintain.
Use Premium Tile and Natural Stone Strategically
Tile and stone have a major influence on the appearance of a luxury bathroom. Large-format porcelain tile can create a clean, seamless look with fewer grout lines, while natural stone introduces unique veining and organic variation. Marble, quartzite, limestone, and other premium materials can be used for floors, shower walls, vanity tops, accent walls, and tub surrounds.
Using expensive materials throughout the entire room is not always necessary. Strategic placement can create a high-end effect while keeping the design balanced. For example, a dramatic stone slab behind the vanity or inside the shower can serve as a focal point. More understated tile can then be used across larger areas of the bathroom.
Material selection should account for more than appearance. Some natural stones require sealing and ongoing care, while certain polished surfaces may become slippery when wet. A knowledgeable design and construction team can help select materials suited to the bathroom’s moisture levels, traffic, and maintenance expectations.
Incorporate Radiant Floor Heating
Heated bathroom floors can make cold mornings more comfortable, particularly during the colder months of the year. Radiant heating systems are installed beneath the finished flooring and distribute warmth evenly across the room. This upgrade can be especially appealing in bathrooms with tile or stone floors, which may otherwise feel cold underfoot.
Radiant floor heating is often easiest to add during a full remodel because the flooring is already being removed. The system must be coordinated with the subfloor, waterproofing, tile installation, and electrical work. Programmable controls may allow homeowners to schedule the floor to warm before the bathroom is typically used. Although it is largely invisible once installed, radiant heat is one of the features that can noticeably improve the daily experience of the space.
Design a Layered Lighting Plan
Lighting is essential in a luxury bathroom because the space needs to support both detailed grooming and relaxation. A single overhead fixture is rarely sufficient. A layered plan combines ambient, task, accent, and decorative lighting to create a room that functions well throughout the day.
An effective bathroom lighting plan may include:
Sconces mounted beside mirrors
Recessed ceiling lights
Shower-rated fixtures
Pendant lights over a vanity or tub
Under-cabinet lighting
Toe-kick lighting
Illuminated mirrors
Lighting inside cabinetry or niches
Dimmers for adjustable brightness
The color temperature and placement of the lights also matter. Vanity lighting should illuminate the face evenly and minimize harsh shadows. Decorative fixtures can introduce personality, but they need to be appropriately rated for the bathroom environment. Dimmers and multiple control zones make it possible to switch from bright morning lighting to a softer evening setting.
Upgrade to High-Quality Plumbing Fixtures
Plumbing fixtures are used every day, making quality particularly important. Premium faucets, shower controls, tub fillers, and accessories often provide smoother operation, better finishes, and more substantial construction than entry-level alternatives. Coordinating the finishes throughout the bathroom can create a cohesive appearance.
Luxury fixtures may include thermostatic shower controls that maintain a consistent water temperature, touchless faucets, wall-mounted faucets, or integrated hand showers. Homeowners may also consider WaterSense-labeled products that reduce water consumption without diminishing comfort. The most appropriate fixtures will depend on the household’s preferences, the home’s water pressure, and the overall design.
Selections should be finalized early enough to coordinate plumbing locations and installation requirements. Some specialty fixtures have unique rough-in specifications or longer lead times. Planning ahead helps prevent delays and ensures that the walls and floors are prepared correctly before the finish work begins.
Add a Private Water Closet
A separate water closet can improve privacy and make a shared primary bathroom more functional. This feature places the toilet behind a door or partial wall, allowing another person to use the vanity, shower, or bathtub at the same time. When designed carefully, the enclosure can feel intentional rather than cramped.
A luxury water closet may include its own ventilation, lighting, storage, and bidet-style features. Some homeowners choose wall-hung toilets to create a streamlined appearance and make the floor easier to clean. Others prefer a traditional high-quality toilet with a concealed or quiet-flush system. The room needs appropriate clearances, ventilation, and access to plumbing to remain comfortable and code-compliant.
Introduce Smart Bathroom Technology
Smart technology can make a luxury bathroom more convenient, but it works best when it supports daily routines without making the room unnecessarily complicated. Controls should be intuitive, reliable, and accessible. Technology also needs to be planned early so wiring, outlets, controls, and waterproofing can be integrated properly.
Smart bathroom upgrades may include:
Programmable heated floors
Digital shower controls
Smart mirrors
Integrated speakers
Automated window shades
Motion-activated night lighting
Defogging mirror systems
Voice-controlled lighting
Smart toilets or bidet seats
Humidity-sensing ventilation fans
The goal is not to include every available device. It is to select features that genuinely improve comfort and usability. A streamlined system with a few well-chosen functions will often provide more long-term satisfaction than a bathroom overloaded with technology.
Improve Ventilation and Moisture Control
Ventilation may not be the most visually exciting part of a remodel, but it is one of the most important. Bathrooms produce significant moisture, particularly when they include large showers, soaking tubs, or steam systems. Inadequate ventilation can contribute to condensation, peeling finishes, unpleasant odors, and moisture-related damage.
A properly sized exhaust fan can help remove moisture efficiently. Humidity-sensing controls allow the fan to activate automatically and continue operating until moisture levels decrease. In larger bathrooms, more than one ventilation point may be necessary. Windows can provide natural ventilation, but they do not replace a properly designed mechanical system.
Luxury construction includes careful attention to the systems behind the finished surfaces. Waterproofing, ventilation, insulation, and air sealing all contribute to the durability and comfort of the room. Investing in these less visible improvements helps protect the finishes and craftsmanship that homeowners see every day.
Include Built-In Seating and Accessible Features
Luxury and accessibility can work together seamlessly. Features such as curbless showers, wider openings, handheld showerheads, comfortable benches, and strategically placed support can make a bathroom safer and easier to use without giving it an institutional appearance. These improvements may also allow homeowners to remain comfortable in the home as their needs change.
A zero-threshold shower is particularly appealing because it creates a clean visual transition while reducing the risk of tripping. Reinforcement can be installed inside the walls during construction, so grab bars can be added immediately or in the future. Lever-style handles, nonslip flooring, and good lighting can further improve usability.
When these details are incorporated into the original design, they can appear elegant and intentional. Thoughtful planning provides flexibility while preserving the high-end atmosphere of the bathroom.
Choose Timeless Design Over Short-Lived Trends
A luxury bathroom remodel is a significant investment, so the design should remain appealing beyond the current season. Trend-driven features can be used selectively, but major permanent elements are usually best chosen with longevity in mind. Flooring, stone, cabinetry, and plumbing fixtures are expensive and disruptive to replace.
Timeless design does not have to feel plain. Homeowners can create character through natural materials, refined millwork, architectural lighting, distinctive hardware, and carefully proportioned details. Trendier colors or patterns can be introduced through paint, towels, artwork, or smaller fixtures that are easier to update.
The surrounding home should also influence the bathroom design. A modern bathroom may feel out of place in a traditional home unless the transition is handled thoughtfully. The strongest remodels respect the home’s architecture while introducing the comfort, technology, and functionality expected in a contemporary luxury space.
Luxury Bathroom Remodeling FAQs
Which luxury bathroom upgrades provide the most practical value?
Walk-in showers, custom cabinetry, improved lighting, heated floors, quality plumbing fixtures, and better ventilation often provide strong practical value because they improve daily comfort and function.
Is a freestanding bathtub necessary in a luxury bathroom?
No. A freestanding tub can be an attractive focal point, but it is only worthwhile when the homeowner enjoys bathing, and the room has enough space for a comfortable installation.
Are heated bathroom floors expensive to operate?
Operating costs depend on the system, bathroom size, insulation, and frequency of use. Programmable controls can help limit energy use by warming the floor only when needed.
What is the best countertop material for a luxury bathroom?
Quartz, natural stone, porcelain, and other premium surfaces can all work well. The best choice depends on the desired appearance, durability, maintenance requirements, and overall design.
Can a luxury bathroom also be designed for aging in place?
Yes. Curbless showers, wider walkways, built-in benches, handheld showerheads, wall reinforcement, nonslip flooring, and improved lighting can be incorporated without compromising the room’s appearance.
How long does a major bathroom remodel take?
The timeline varies based on the size of the room, structural changes, permitting, product availability, custom materials, and the complexity of the design. Detailed planning before construction can help reduce avoidable delays.
Does a bathroom remodel require permits?
Permit requirements depend on the scope of work and local regulations. Projects involving plumbing, electrical work, structural changes, or ventilation frequently require permits and inspections.
Should all bathroom fixtures have the same finish?
They do not have to match exactly, but the finishes should feel coordinated. Mixing metals can work when the selections are intentional and repeated consistently throughout the room.
Create a Luxury Bathroom With Rite-Way Custom Homes
A luxury bathroom remodel deserves the same level of planning, craftsmanship, and attention to detail as any other major home renovation. At Rite-Way Custom Homes, we specialize in extraordinary custom homes, luxury home additions, and major home renovations for discerning homeowners. Whether you are reimagining a primary bathroom, expanding your living space, or transforming an existing home, our experienced team can help bring your vision to life.
For over 30 years, we have built and renovated some of the most beautiful custom homes for our clients. Our commitment to quality, integrity, personalized service, and expert craftsmanship has made us a trusted luxury home builder. Contact us to begin planning a bathroom and home that reflect your style, support your needs, and exceed your expectations.